Hello everyone,
Last time I shared 100% Working and Easiest Method to Root Xiaomi Redmi Note 4 The process to Root Redmi 4 is more or less same. You need unlocked bootloader in-order to Root Redmi 4. This guide is for all the Redmi 4 variants 2GB | 3GB | 4GB and all Redmi Indian Variant

Caution:
If you don’t follow the guide properly, there will be chances of damage and complete failure of a mobile device. Follow at your own risk.
- This guide is only meant for Redmi 4. Do not try this on other Android phones.
- Make sure Bootloader is Unlocked. If not follow this – Unlock Xiaomi Bootloader
- Enable USB Debugging from Developers Menu
- Make sure you have all the drivers installed.
- Maintain at least 60% battery before following the procedure
- Make sure the connection between PC and mobile phone is good. Don’t use lose cable
- Follow the guide step-by-step and completely.
Download:
- Download and install Universal ADB Driver
- Download ADB FILES
- Download TWRP Recovery
- Download SuperSu.Zip (Do not unzip it)
- Download LazyFlasher (Do not unzip it)
- Download Mi Unlock Tool
Procedure:
[100% Working Method] How to Root Redmi 4
Note: ONLY PROCEED if BOOTLOADER is UNLOCKED.
- Now connect your Redmi 4 to PC via USB cable.
- Open the ADB Folder. (Link is given in Download Section above)
- Once the folder is opened, hold Shift Key > Right click > Open command Windows here
- The Command prompt will open.
- Now enter – adb devices
- If you get some alphanumeric code in return on screen, the device is successfully connected. Good to go.
- Switch off your device
- Press and hold Volume Down and Power button. You’ll see fastboot mode
- Go back to your computer and enter this in command prompt – fastboot devices
- Again it should show some alphanumeric code in return. If yes, proceed. If no, go back to Step 1
- Make sure TWRP image is copied in ADB folder.
- Run this code – fastboot flash recovery twrp.img
- Now Press Volume Up + Power button simultaneously
- You’ll see the screen, tap on Recovery button
- You will see Chinese text, tap on Blue button
- You have now entered Recovery Mode
Now carefully follow these steps to install SuperSU
- Follow the image to change default language from Chinese to English
-
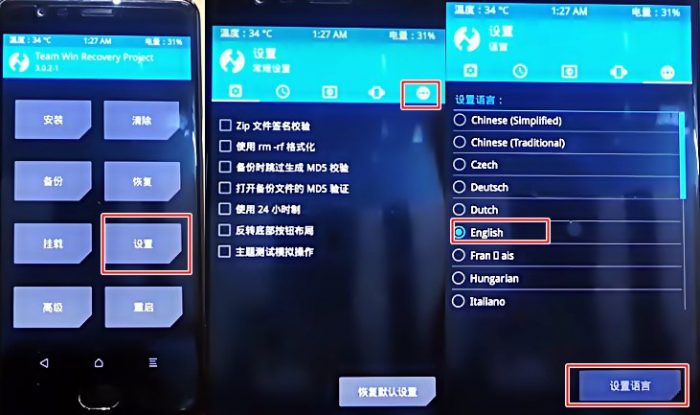
Change Chinese to English Language TWRP - Now tap on Wipe > Format Data > Yes
- Once done, go back to the main screen
- Tap Reboot > Recovery
- Reboot to TWRP
- Copy SuperSU and LazyFlaser zip files to the internal memory of your Redmi 4
- Tap Install > Select SuperSU zip file > Swipe to Install
- After this, flash LazyFlasher using the same method
- Choose Wipe Cache/Dalvik after installing LazyFlasher
- Reboot
- Voila! You have successfully Rooted Redmi 4 with SuperSU
You can check Root by installing Root Checker app from Play Store. If you are facing any issue, please comment below.
Update: 23/07/2019 SuperSU file restored again.
Update: 29/12/2019 SuperSU file link updated.
Download SuperSu.Zip (Do not unzip it) this supersu.zip file doesnt exist please upload a new file and update directory
Updated post. Thank you for notifying.
SuperSu.Zip, the download is still not working ?
Working here
Dear Ayush.
Download SuperSu.Zip (Do not unzip it) Not able to download this file . Please reload the links
Thank you, I have updated the link. You can also download from here – https://androidfilehost.com/?fid=961840155545568721
Now tap on Wipe > Format Data > Yes after this system shwo error. not successfully completed . what i will do.
again go to fastboot mode and again flash twrp.img after press volume up and hit command “fastboot reboot” after that directly go to wipe you can format data.
none of the comment or any link working
If I do not format or wipe data, will there be any problem? I dont want to wipe because each app has to be installed again separately. That is so much pain.
And if wipe/format is mandatory, then please mention to take backup beforehand. I have unlocked bootloader and was going to go through the steps, then I saw the wipe/format section. As I do not have any backup and do not want to install all apps again, I did not continue.
I don’t have pc